Microsoft just released the 1.0 version of their Node.js Tools for Visual Studio. This gives Windows developers a pretty great environment for building clean, feature rich Node.js applications. It’s easy to take an application built in Visual Studio and deploy to Microsoft’s own cloud, so how about pushing apps elsewhere? In this post, I’ll show you how quick and easy it is to set up a Node.js application in Visual Studio, and push to a Cloud Foundry endpoint.
As a prerequisite, take 30 seconds to download and install the Cloud Foundry CLI, and sign up for a friendly Cloud Foundry provider. And, install the new Node.js Tools for Visual Studio.
Creating and Deploying an Express Application
Let’s start with the lightning round, and then I’ll go back and show off some of the features of this toolkit.
Step 1 – Open Visual Studio and create the Node.js Express project (25 seconds)
The Node.js Tools for Visual Studio add a few things to the Visual Studio experience. One of those is the option to select Node project types. This makes it super easy to spin up an example Express application.

The sample project selected above includes a package.json file with all the dependencies. Visual Studio goes out and reconciles them all by downloading the packages via npm.

The project loads up quickly, and you can see a standard Express skeleton project. Note that Visual Studio doesn’t throw any useless cruft into the solution. It’s all just basic Node stuff. That’s nice.

Step 2 – Open Command Prompt and target the AppFog v2 environment (30 seconds)
This Express app is boring, but technically a complete, deployable project. Let’s do that. I didn’t see an obvious way to get my Cloud Foundry-aware command line within the Visual Studio shell itself, but it’s crazy easy to open one that’s pointed at our project directory. Right-clicking the Visual Studio project gives the option to open a command prompt at the root of the project.

Before deploying, I made sure I had the credentials and target API for my Cloud Foundry endpoint. In this case, I’m using the not-yet-released AppFog v2 from CenturyLink. “Sneak peek alert!”

After logging into my endpoint via the Cloud Foundry CLI, I was ready to push the app.
Step 3 – Push application (81 seconds)
With a simple “cf push” command, I was off and running. App deployment times vary based on project size and complexity. If I had deleted (or excluded) all the local packages, then Cloud Foundry would have simply downloaded them all server-side, thus accelerating the upload. I was lazy, and just sent all my files up to the platform fabric directly.

After a short time, my app is staged, deployed, and started.
Step 4 – Verify!
The best part of any demo: seeing the results!

You don’t really need to know anything about Node (or Cloud Foundry!) to test this out. It’s never been easier to sample new technology.
Exploring Additional Node Capabilities in Visual Studio
Let’s retrace our steps a bit and see what else these Node tools put into Visual Studio. First, you’ll see a host of options when creating a new Visual Studio project. There are empty Node.js projects (that pretty much just include a package.json and app.js file), Express applications, and even Azure-flavored ones.

The toolkit includes some Intellisense for Node.js developers which is nice. In the case below, it knows what methods are available on common object types.

For installing packages, there are two main options. First, you can use the Node.js Interactive Window to issue commands. One such command is .npm and I can install anything from the global directory. Such as the awesome socket.io package.

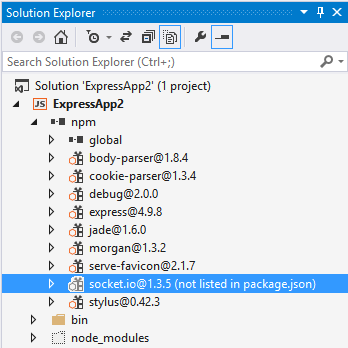
One downside of using this mechanism is that the package.json file isn’t automatically updated. However, Visual Studio helpfully reminds you of that.

The “preferred” way to install packages seems to be the GUI where you can easily browse and select your chosen package. There’s options here to choose a version, pick a dependency type, and add to the package.json file. Pretty handy.

The Toolkit also makes it easy to quickly spin up and debug an app. Press F5 starts up the Node server and opens a browser window that points at that server and relevant port.

Summary
I’ve used a few different Node.js development environments on Windows, and Visual Studio is quickly becoming a top-tier choice. If you’re just starting out with Node, or a seasoned developer, Visual Studio seems to have the nice mix of helpful capabilities while not getting in the way too much.
Wow! NTVS was published on March 25; and this stellar how-to post is out on the 27th! Richard – you are amazing…
Signed: your long-term fan!